Friday, January 25, 2013

How to bleed a radiator

Do you radiators feel cold?

With all the fantastic weather we have been receiving as of late, I'm betting that the majority of us folk have had the heating turned. Besides the cost of energy, are you actually getting the full potential from your radiator? If your radiator feels like its lacking a bit in the heat department the most likely solution is the radiator simply needs a good old bleeding! And these fine plumbers in Newcastle are going to show you how.

Cold at the top and warm at the bottom? 

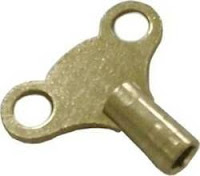
If your radiator feels cold at the top and warmer at the bottom this is a tell tale sign of trapped air within the radiator cavity which prevents a normal flow of water and causes the dampening of heat. but don't worry this doesn't usually mean calling a plumber out! (But if you are looking for a plumber in newcastle or a plumber in Gateshead and the rest of the the north Tyneside area be sure to give us a call) you can fix this little issue yourself with a simple little tool you may already have lying about in your toolbox. A radiator key! 


If you don't have one at lying around you can easily pick up a radiator key for under £1 from any hardware store. The good thing is radiator keys are universal so you don't need a special type or size as one size will fit all. The key fits snugly into the radiator value located at the top side of your radiator and a few turns of the key will result in releasing that trapped air and getting some heat back into that radiator. So lets get to it? First things first, there are a few safety precautions we must take before going a head with the bleeding (as always, but it's better to be safe than sorry isn't it? 


Turn of your central heating

This is the most important one, as turning off the central heating will prevent any further air from entering the radiator ensuring we get all the trapped air out.


I've got the key


Depending on the types, models and makes of the radiator the bleed valve (which is where we will be inserting the key) varies in location but the most common place is on the sides usually towards the top. It may or may not have a small red handle. Place the key on the valve but don't turn it just yet!

Flooding alert 


I'm just kidding. But when you turn the key and the valve opens there will be a slight amount of water  which sprays out the valve due to the pressure, this is completely normal and there is no risk of damaging your radiator or causing a leak during this process. Simply have a paper towel, and old rag or something to catch the spray of water. Because the water inside a radiator may contain some chemicals which discolours the water and could potentially stain any wallpaper etc ensure you hold the towel or whatever you use in as close to a 360 degree fashion as possible. 

The fun bit


Once you've located the bleed valve insert the key and turn in an anti clockwise fashion fe really about a quarter to half a turn of the valve. At this point you should hear a hissing sound of the air escaping and there will be a mist of water (ensure you have your paper towel, or rag at hand) wait until the hissing sound stops and the water begins to dribble then turn the key back to its original position. That's it all done! Simply turn back on your central heating and providing you have followed these steps the radiator should be working now to its full capacity!

Do you need a qualified plumber around the north east? Croftside plumbing and heating has a Plumber Newcastle and the entire north east. Just call us today for a free no obligation quotation.


Tuesday, January 15, 2013

Fitting new basin taps


Guide to replacing a basin tap


So we had a call out for a plumber in gosforth early last week - the customer had bought some new taps for the wash basin in the bathroom and decided to try and fit them himself. To cut a long story short he had some flooding and I was called out to fix the problem.

Turns out they forgot to turn the water off! Even though this is the most obvious thing to do - you would be surprised how many people forget! Anyway, this prompted me to put up a quick guide to replacing some taps if you ever feel brave enough to do it! It's actually incredibly easy to do so just follow what I say step by step! and if in doubt please give us a call or post on the blog.

The golden rule


Turn the main water supply water off - you can do this by finding the stop cock and turning it in a clockwise direction to close the valve. There are various types of stop cocks and the locations vary, this is something you should be aware of at all times so its best to find out where it is for future reference even if you don’t plan on any DIY plumbing. But don’t worry, if you have any problems you can always find a plumber in newcastle who'll be able to help.


Remove the old taps

This bit can be tricky as the taps are held in with a large nut. Depending on space constrictions this may or may not be easily assessable and it may require a special plumbing wrench, never try and lodge spanners or other tools behind areas concentrated with pipes - you don’t know what kind of damage you could cause! If you have enough room to access the nut then a standard adjustable wrench should be ample to complete the job - if you find it difficult to loosen the nut just apply a small ammount of WD40 or similar and they taps should loosen off with ease, there may or may not be a extra bolt holding the taps to the basin itself - if so simply loosen and remove this.


Inserting the new taps


Depending on the type of taps you are trying to fit there is a slight difference in the method. For standard single taps simply attach the new taps and reconnect up to the pipes. The taps will almost always come with anti-slip washers that should be inserted under the screw pipes in contact with the bare surface of the basin. Tighten up but don’t over tighten the bolts. If the taps do not come with anti-slip washers you can apply a small amount of silicone to the area to form a watertight seal.

If you are fitting a mixer tap ensure that the holes located on the basin match up with the holes of the mixer unit as sizes can vary. The process for fitting is the same as above just ensure that when putting on the new tap unit that you fit the pipe tails to the tap first before attaching it to the wash basin - as it can proove a nuisance trying to tighten them up the other way round.


Bish Bash Bosh


All done! Before turning on the water supply ensure the tap unit is securely fixed, the anti-slip washers or attached, or you have applied some silicone to the area. Its also a good idea to pour a small amount of water around the area to make sure you have a watertight seal if you have used silicone as sometimes if the area is not clean or free from debris it can leave some small gaps and allow water to get percolate through.

You can now go back to the stop cock and turn it in a anti-clockwise direction until it is fully turned on. Open the taps on and leave running for a few minutes to ensure there are no leaks.


Job done


So if alls well you have just successfully inserted some new taps in your washbasin. If you need any assistance just give us a call, or post on the blog we’ll be happy to help. And please remember if you are at in any point in doubt contact a competent plumber to complete the job for you. We cover the whole of the north east and have plumbers in gateshead, plumbers in tynemouth, plumbers in whitley bay, plumbers in cramlington and even plumbers in ponteland. So you can be sure there is always a fully qualified and professional plumber available within your area.


Happy new year everyone!